Monday, August 30, 2010

Pop Art Canvases

As some of you know, I'm a nanny.  Two of the kids I watch are twins and their birthday is coming up at the end of September.  I knew I wanted to make them something so they will always have a reminder of me.  I thought about doing paintings of their names, but that's been done.  Then I had the brilliant idea to do Andy Warhol style art of both of them (and their sister too because I didn't want her to feel left out).  There are tons of Web sites that offer the service to turn your portrait into pop art, like mydavinci.com, for $64.85 for an 8 x 8 print.  I knew I could do it myself in Photoshop, mount the prints to canvas and BAM - expensive art for cheap!


I used the same 6 x 6 canvases from Michael's that I used for the seasons mosaics.  It's a lot cheaper to buy a pack of four 6 x 6 canvases than it is to buy one 12 x 12 canvas - whoda thunk it?

I painted the sides and about half an inch on the top with black acrylic and let them dry overnight.

I made the artwork 6 x 6 to fit on the canvases, then had them printed as 8 x 10s at Sam's Club.  I usually have prints made at CVS because there's one right around the corner, but the price for an 8 x 10 at CVS is $3.99, so for 12 prints, it would have been $48!  Absolutely ridiculous.  Walgreen's was only $2.99, but in the end, Sam's won with 8 x 10 prints for $1.46!  Sam's is definitely the best place to get prints done, for future reference.

I used my trusty Fiskars rotary paper cutter to trim the photos down to size.

I mounted the trimmed prints to the canvas using matte Mod Podge.  They looked pretty good just like this, but I felt they looked a little too much like plain ol' prints mounted to canvas.  They needed a little texture.

So I used the matte Mod Podge and a stencil brush to add some texture to the photo to make it look more like artwork.

I covered all the sides and the top with the Mod Podge to give a uniform look.


This is how the texture looked when it dried.  So much better than the glossy look, don't you think?  I think it makes it look more like the photo is printed on the canvas rather than glued to it.

And the finished product.  I am so extremely happy with them!  I debated on attaching them using 3 inches of ribbon in between, but in the end, I decided I liked the clean look better so I left them separate.  And what's even better... the grand total came out to less than $20 for each kid's one-of-a-kind pop art!

P.S. Isn't my subject adorable eating her watermelon?

Update: Go here to see the other two completed sets.

Update #2: These are now available in my shop.

Friday, August 27, 2010

The Old Mountain Jug

Remember a couple weeks ago when I picked these jugs up at a garage sale?  The smaller one I just liked, but when we saw the larger one, we knew it looked exactly like The Old Mountain Jug.  Go to the link to read all about the Battle for the Old Mountain Jug, an annual football game played between Appalachian State and Western Carolina (alma mater of Rachel from Big Brother - gag me).  Anywho, we knew we needed to make a replica of it to take to the annual ASU vs. WCU game.


First, I spray painted the whole thing with Krylon Indoor/Outdoor gloss spray paint in Sun Yellow.

Next, I used this image of Yosef, ASU's mascot, to make a stencil.  Both ASU's and WCU's mascots have been updated since the Jug was created, but I had to be authentic and use the old logos.  Making a stencil was harder than I thought it would be and took some time, but it was worth it in the end.

Using the stencil, a stencil brush, and black ceramic paint  to create Yosef on one side of the Jug.

The finished Yosef!  I'm happy with it (as long as I don't look too closely).

Next, it was time to write Mountaineers under the Yosef head.  I've used this technique a lot and it's really effective.  I printed the word Mountaineers in Arial (95 pt I think), roughly cut the letters apart, then turned each slip of paper over and rubbed a pencil on the back.  I then taped each letter (right-side up) to the Jug in a small arc under Yosef, and traced the letters.  The pressure from tracing them transferred the pencil graphite to the Jug.  I've learned that graphite from a pencil transfers to just about anything.  After they were all transferred onto the Jug, I used the smallest paintbrush I could find and filled them in with black ceramic paint.

Now, time for the opposing side of the Jug.  I used this image for the WCU Catamount.  A stencil was not going to work this time because of all the spots and separate pieces so I decided to use the graphite tracing technique for this side.

No need to trace perfectly.  In fact, you don't even really have to trace, just rubbing pencil all over the back achieves the same effect.  You only have to be careful about tracing on the right side.

The hardest part was getting the Catamount positioned in the same spot the Yosef was positioned on the other side.  In the end, it should be about an inch to the left, but as long as we don't tell anyone, I don't think they'll notice.

The Catamount after being traced onto the Jug.


The finished Catamount!  Not too shabby.  I had to use acrylic paint for the tongue because I didn't buy any red ceramic paint at Michael's, and I can definitely tell the difference (the ceramic paint is shiny and the acrylic isn't), but it was worth it to me not to have to buy another bottle of paint that I will probably never use again.

Positioning the letters proved to be a struggle too, but I just had to keep telling myself that I'm the only one who will ever notice if the C and the S aren't at the same height.


And now, for the finished product...

(Drumroll, please...)


And here's the "real life" Old Mountain Jug (excuse the crappy Internet pictures):
Chancellor Peacock carrying the Jug after an ASU win!
And sadly, I guess WCU has to win sometimes. (This was the. only. picture of the Catamount side I could find on the net, so I can't really tell how good or bad of a job I did recreating it, but I like to think mine looks better than the real one.)

Wednesday, August 25, 2010

What I Wore Wednesday

Happy Wednesday everyone!  I've been off work this week and the weather has finally cooled down some, so I only wore shorts one day - yes!  Have I mentioned before that I hate shorts?  Well, I do.  They don't really look good on anyone unless you're 5'8 and have toned, tanned legs.  Unfortunately, that's not me.  Also, look for a guest appearance from my aunt!

Day: Thursday
Where: Work, picking up my Aunt Missa at the airport, then out to dinner
Earrings: Target
Pink tank: AE
Gray tank: Old Navy
Skirt: Gap
Shoes: Old Navy

Day: Friday
Where: Ohio Amish Country with Aunt Missa
Top: Banana Republic
Jeans: AE
Shoes: Rainbow

Day: Saturday
Where: Out to dinner
Me
Shirt: Banana Republic
Jeans: AE
Shoes: Dillard's
Aunt Missa
Shirt: Macy's
Jeans: JCPenney
Shoes: Aigner Outlet

Day: Sunday
Tank & Shorts: Old Navy
Shoes: Saucony

Day: Monday
Where: Lots of errands
Shirt: Gap
Jeans: AE
Shoes: Dillard's

Day: Tuesday
Where: Walmart
White tank: Old Navy
Maroon tank: AE
Jeans: AE
Shoes: Rainbow

Hmm, I think AE and Gap/Banana/ON should totally hire me as a spokesperson, because apparently, those are the only places I shop.  Hey, when you find something that works, stick to it!

Wednesday, August 18, 2010

What I Wore Wednesday

Wow, I can't believe I've been doing this for 8 weeks now!  I guess it's such a part of my routine that I don't even think about it anymore!  Which is probably not such a good thing because my outfit choices haven't gotten any more clever than they would be if I wasn't taken a picture every day and posting it for the world to see.  Oh well, it's fun to do anyway!

Day: Thursday
Where: Work
Shirt: AE
Skirt: Old Navy
Shoes: Rainbow

Day: Saturday
Where: Garage saleing and errands
Scarf: Miley Cyrus + Max Azria (Walmart)
Shirt: AE
Shorts: Express
Shoes: Rainbow

Day: Sunday
Where: North Ridgeville Corn Festival and Walmart
Shirt: Gap
Tank: AE
Camo Skirt: AE
Shoes: Rainbow

Day: Monday
Where: Work
Necklaces: Claire's
Awesome leather bracelet: NR Corn Festival
Green tank: Dick's
Pink tank: AE
Skirt: Old Navy
Shoes: Rainbow

Day: Wednesday
Where: Work
All I felt like showing you was my shirt: Old Navy and soo comfortable

As always, linking up to:
Poppy

Saturday, August 14, 2010

Garage Sale Saturday

I've never really been big on garage sales.  Other than the city-wide garage sale a couple months ago, I can't remember the last time I went to one.  Probably when I was a kid with my uncle.  I decided last night that Steven and I would hit a few up this morning, so I searched on Craigslist and wrote down a list of 10 addresses of people having sales today.  We ended up going to 5 or 6 and I was just amazed at the cool things we found!  I think I'll definitely be doing this more often.  So much fun for so little money!
 
Candelabra: $3

Patriotic Basket: 50 cents (Bought this with a Snow White puzzle, not pictured, which was also 50 cents)

Awesome ceramic jugs:  $12 for the large one, $3 for the small one. (The large one is destined for a makeover... stay tuned!)

Brand new shadow boxes: $2 for all three

Milk glass bud vases: $2!!!

Shoebox full of tiny Halloween ornaments: $2

Now for a look at their new, probably temporary, homes:

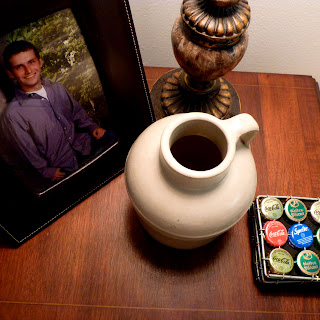
See my fabulous bottle cap coasters?  Bought at The Field Museum in Chicago... a little bit of a splurge, but totally worth it!  (Oh, and that's my brother Jamey in the picture)

Still need to get some candles...
These stone tealight holders were also bought at The Field Museum.

And my favorite... the milk glass vases.  Absolutely love them!

Total spent: $25
Happiness attained: Priceless