Hi guys! Just popping in really quickly to tell you I changed my blog address!
Instead of maggieandabbie.blogspot.com, you can now find me at twoohtwoseven.blogspot.com. Change your favorites accordingly! If you follow me in a reader, nothing should change.
I can't wait to show you guys what I scored at the International Collectibles and Antiques Festival at the Metrolina Expo this weekend, but you'll have to wait until tomorrow! Tee hee hee.
Tuesday, July 5, 2011
Friday, July 1, 2011
July
Hi guys! Sorry, long time no post, but sometimes quality trumps quantity, right? That being said, my secret goal for June was to post something every. single. day, but alas, I fell off the wagon. I forgot to do a post one day and since my goal was shot, I figured why continue? So, I'm going to let you guys in on my goal(s) for July, so that I have someone to be accountable to. Here goes:
1) 3 posts per week (Posting every day just isn't realistic for me. I would end up writing about what I ate for lunch and my new toe nail design - currently patriotic, fyi - and I'm sure you guys have better things to do than read about ramen noodles.)
2) Open an Etsy shop. Right now I'm in the throes of production, working on handmade items so I canhopefully before the end of the year open an Etsy shop. Stay tuned. I really hope to get it going by the end of July.
3) Launch a new blog design! Eee, so excited about this one. I'm almost finished with it but I want to launch it simultaneously with my Etsy shop, so you'll have to wait just a wee bit longer.
Okay, that's it for now. I'm off to figure out how to make homemade ice cream for the 4th. I've never done it before so I'm crossing my fingers that it turns out edible!
Have a great holiday!
1) 3 posts per week (Posting every day just isn't realistic for me. I would end up writing about what I ate for lunch and my new toe nail design - currently patriotic, fyi - and I'm sure you guys have better things to do than read about ramen noodles.)
2) Open an Etsy shop. Right now I'm in the throes of production, working on handmade items so I can
3) Launch a new blog design! Eee, so excited about this one. I'm almost finished with it but I want to launch it simultaneously with my Etsy shop, so you'll have to wait just a wee bit longer.
Okay, that's it for now. I'm off to figure out how to make homemade ice cream for the 4th. I've never done it before so I'm crossing my fingers that it turns out edible!
Have a great holiday!
Monday, June 20, 2011
Sea Glass
Do you guys love sea glass as much as I do? I've never found an "authentic" piece of sea glass (Wikipedia says it's more common in the northeast than it is down south), but when I came across a bag of sea glass at TJMaxx for $5 the other day, I knew exactly where I wanted to put it.
Before:

After:

It's hard to tell in the photo but the blue and green glass really pulls those colors out of the granite in our bathroom.
Love.
<meta HTTP-EQUIV="REFRESH" content="0; url=http://twoohtwoseven.blogspot.com/2011/06/sea-glass.html">/>
Friday, June 17, 2011
Etsy Dreaming
I love browsing Etsy. There's just so much to look at that before I know it, I've spent a whole afternoon click-click-clicking away. That and Pinterest. Oh, Pinterest. Anywho, here are some items I recently found on Etsy that I just love.


Owl Pendant Necklace at DalComi

eReader Techee Sleeve at Rogue Theory

Antique Brass Owl Earrings at Cute Charm Jewelry
North Carolina Pillow at lovecalifornia

Coffee Cozy at natalya1905

Seahorse Pendant at Fingerprince
(This seller has reallyyyy cute owl pendants and earrings too, but I tried not to make this an everything-owl post. Even though I really want to. Because I love those cute big-eyed suckers.)
What have you been dreaming about lately?
Thursday, June 16, 2011
Independence Day Decor
I used my Tuesday off this week to pull out all of my July 4th decor.
First, I wove some patriotic ribbon through my awesome wicker wreath forms.


Cute, right? And soo easy! I just love these wreaths! I have a flag out front too that I didn't take a picture of, of course.
I got these pillar holders on clearance at Target (I think) last year.

This basket was a yard sale find last year. It still had the 50 cent price tag on it.

I threw some flags in this little pitcher (bought a four-pack at HobLob for $1!).

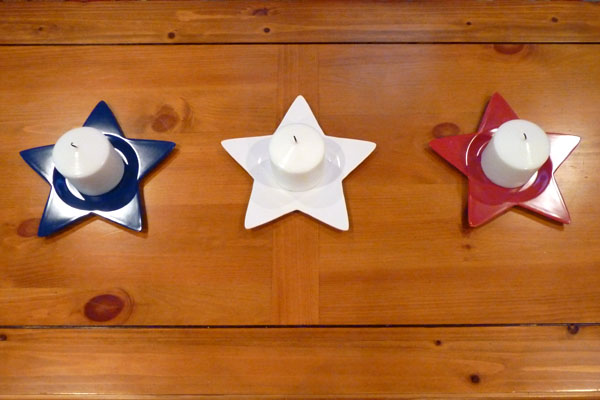
I got these little votive holders at HobLob two years ago, I think. On clearance, of course.

Okay, this isn't really patriotic, but I bought this mini table runner at Target on clearance for $5, so I just had to include it! Isn't it cute?!

My brother's moving to Nashville tomorrow, so I'm off bright and early in the morning to help him get moved in and settled. He's starting a 9-month program at SAE next week, which he's pretty excited about. We had dinner Tuesday night and I had the thought that he may not ever live in North Carolina again, which made him kind of sad. SAE has a job placement program, so hopefully they will be able to get him a job after he gets his certification, and I seriously doubt it will be in NC, but I guess you just never know! He's never lived on his own before, so it will be interesting to see if he can figure out how to do laundry and other domestic things. I think it will be good for him though. I'm just proud of him for following his dreams!
<meta HTTP-EQUIV="REFRESH" content="0; http://twoohtwoseven.blogspot.com/2011/06/independence-day-decor.html">/>
Wednesday, June 15, 2011
Ziplocked Bikinis
Our master closet makeover is 90% done, but I'm waiting to find the time to finish the other 10% before I show you guys! In the meantime, I've been reorganizing my clothes to fit with our new closet design. In our old closet, I kept my pajamas on two shelves of that massive wooden shelving unit. It worked well, but there just wasn't a place for them in our new closet. Since I decided to pack away my out-of-season clothes this year, I freed up two drawers in our armoire. I was trying to figure out how all my PJ bottoms, sleep shorts, t-shirts, etc etc would fit into these two drawers, when I realized that my bathing suits (which had to stay in here too) were a mess. Whenever I would open this drawer to find a suit, I had to rummage around until I found a matching set. It was really annoying, not to mention having them all just thrown in there took up more space than necessary.


What a mess! I thunk and thunk about how I could remedy this problem, and I thought, hey, how about ziploc bags?

I put each of my suits into its own little ziploc, except for my two tankinis and one-piece that wouldn't fit.

For some reason, I have one other suit that was hiding behind me and didn't make it into the pics. I honestly didn't even realize I had this many bathing suits! The purple one on the left actually has two bottoms that go with the same top, and I have black bottoms that go with a black bikini top and a black tankini so counting each of those as two suits, I have 10 suits! Geez, no wonder they were always a mess.

Much better, don't you think?

So what do you think? How do you organize your bathing suits?
Tuesday, June 14, 2011
Scrapbook Paper Mantlescape
On my baby shower post a couple days ago, you may remember I mentioned that I loved the mantlescape I did. I loved it so much that I didn't want to put my old things back out. I've become a huge fan of white lately... anything I buy (except for clothes... can't stand white clothes) has to be white. For the baby shower, I put scrapbook paper in the frames under the TV and loved how it brought the whole color scheme together. So instead of putting the photos back in the frames, I rummaged through my paper box and filled them with cute scrapbook papers.


I love this one oh so much. The silhouettes are velvety soft and it's just so stinkin' cute!


I lovey lovey love it. And it was so simple... why didn't I think of it before?
Sunday, June 12, 2011
Black, White and Green Polka Dotty Cow Themed Baby Shower
A couple weekends ago, my aunt, cousin and I threw a baby shower for my other cousin. She's due in July with a baby boy. The inspiration behind the theme was the mom-to-be's love of cows.
I made the invitations with help from my Cricut.

I bought two packs of flat black cards and envelopes at Michaels, cut the cards down so I could add a polka dotty border, and added some green and black grosgrain ribbon (the green looks muted in the above pic but it was actually really bright). I cut out the cow, the letters, and the white shape on the front of the envelope with my Cricut. I printed out the deets using some cute fonts (The words were supposed to be black but apparently my printer was running out of ink so they printed gray. Oh well. I meant to do that.), attached a piece of ribbon with a brad and slid it in a slot I'd made in the black card (so it slid down between the polka dotty paper and the black card). Cute, right? I was pretty proud of them.

I wanted to do some outside decor so the guests could find my house easily and thought I could make a cow print garden flag out of felt. So sad, but I didn't get any pictures of it hanging up with the balloons attached to the flag stake!

Abbie is addicted to felt. When she started getting in the way of my work, I threw a scrap piece on the floor and that kept her busy for a while.

Ta da! I used a piece of poster board as the backing, hot glued two pieces of white felt to it, then cut random cow spot looking shapes out of black felt and hot glued them as well. I attached pieces of the same green ribbon I used on the invites to the top for the flag to hang from, cut out a big N (for Noah, the baby's name) with my Cricut, and voila! Easy cow print garden flag.
I think my front doors look empty without wreaths, and I really wanted to make some for the shower. I found these awesome wreath forms at AC Moore for $5 each! I thought that was an awesome price for something that can be changed time and time again. I just weaved some ribbon through so they matched the shower colors. Now I have cool wreaths that I can change up as often as my heart desires!


A few weeks before the shower, I started collecting mason jars to use as drinking glasses. I bought the white melamine tray at Target for $12.99, and got the tags, baker's twine, and paper straws on Etsy. The hard part was finding places to stash the jars when the shower was over. Thankfully I was able to squeeze them in the cabinet above the microwave.

I rounded up all my white decor items and came up with this mantlescape. Actually, I really like this look for summer, so I'm leaving it! I replaced the photos in the frames with the same scrapbook paper I used for the invites and wrote "Welcome Baby" in the center two. (I'm thinking about not putting photos back in these frames and just framing some cute scrapbook paper instead. I really liked the way this turned out.)


Welcome baby Noah Glenn!


Of course a party's not a party without some tissue paper pom poms. This was my first time making them and it was so super easy! I pawned them off on the mom-to-be when she left the party because seriously, where do you store these huge things? And I would feel bad throwing them away. I guess you could take them apart and use the tissue paper, but after all that folding and cutting, it just seems like a waste!
Can you spot the cow print piggy bank in the above photo? My friend Crystal and I were at Dollar Tree and she found this cute plain ceramic pig and said "Hey, you could paint cow spots on him!" and I was like "Um, but he's a pig." Needless to say, she convinced me and for only $1 and ten minutes of my time, I think it's the cutest thing ever!
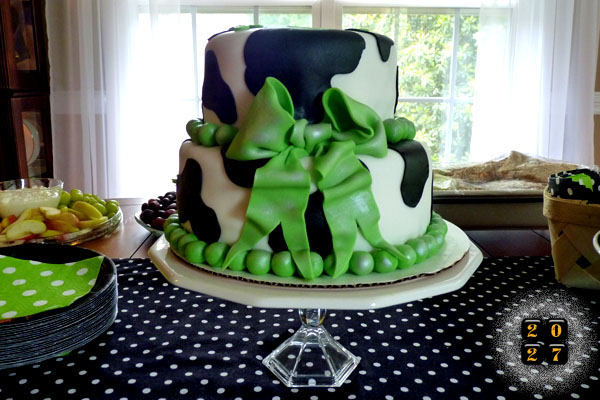
We had the cake made and it was by far the most expensive thing at the shower. It turned out so cute though! But it was huge. We saved the top tier for the baby to eat on his first birthday.


And, finally, here's the Mom-to-Be! Congratulations Tess! We can't wait to meet baby Noah.
Linking to these parties.
Monday, May 16, 2011
Empty Frame Gallery Wall
A couple weeks ago on one of my days off I was straightening up my craft room when I realized I had collected quite a few Goodwill frames. I'd been buying them whenever I found one I liked, for this idea I'd had brewing around in my head. I didn't think I had enough yet, but I took out the ugliness that was in each one of them and started laying them out (on my guest room floor - probably the smallest space I could have chosen). And whadya know, but I think I had just enough to make an empty frame gallery wall! Okay, okay, I know this isn't a new idea or anything, but what a cheap way to make a statement!
I measured the wall I wanted them on and started playing with different configurations.

Hmm, I liked starting with the two white ones in the middle and working out from there, but this arrangement left something to be desired.

I found the one on the bottom left in our under-the-stairs storage closet and added it. A little better.

Hmm, the right side needs something else.

Almost there...

This is it! Except I ended up hanging the brown one on the right horizontally.

Now for a couple coats of black spray paint on the ones that aren't already black.

I traced all of the frames onto kraft paper, cut them out and taped them up on the wall in the arrangement I decided on. (An easier way would be to roll out a huge sheet of kraft paper, lay your frames on it and trace them in the design you want. That way instead of having individual rectangles of paper to hang up on the wall, which always want to curl up and come off, you'd only have one sheet and wouldn't have to make sure they were all level and the spacing was correct, because you could do all that while you're tracing.)
I got out my hammer and pounded nails in where I had marked on the kraft paper, put the frames up, then stuck some poster putty in the bottom corners so they would stay straight, and voila!


I like the dimension the different frames give to the wall. I stayed safe with black, but I think a turquoise or red would be fun too!
Total cost for this wall art: $6 for the keys, and probably another $6 for all the frames. Already had the spray paint. $12 for a wall full of art - I'll take it!
Linking up with Sarah's Spray Paint Party!

Subscribe to:
Posts (Atom)

