Wednesday, June 15, 2011

Ziplocked Bikinis

Our master closet makeover is 90% done, but I'm waiting to find the time to finish the other 10% before I show you guys!  In the meantime, I've been reorganizing my clothes to fit with our new closet design.  In our old closet, I kept my pajamas on two shelves of that massive wooden shelving unit.  It worked well, but there just wasn't a place for them in our new closet.  Since I decided to pack away my out-of-season clothes this year, I freed up two drawers in our armoire.  I was trying to figure out how all my PJ bottoms, sleep shorts, t-shirts, etc etc would fit into these two drawers, when I realized that my bathing suits (which had to stay in here too) were a mess.  Whenever I would open this drawer to find a suit, I had to rummage around until I found a matching set.  It was really annoying, not to mention having them all just thrown in there took up more space than necessary.


What a mess!  I thunk and thunk about how I could remedy this problem, and I thought, hey, how about ziploc bags?


I put each of my suits into its own little ziploc, except for my two tankinis and one-piece that wouldn't fit.

For some reason, I have one other suit that was hiding behind me and didn't make it into the pics.  I honestly didn't even realize I had this many bathing suits!  The purple one on the left actually has two bottoms that go with the same top, and I have black bottoms that go with a black bikini top and a black tankini so counting each of those as two suits, I have 10 suits!  Geez, no wonder they were always a mess.


Much better, don't you think?


So what do you think?  How do you organize your bathing suits?

Tuesday, June 14, 2011

Scrapbook Paper Mantlescape

On my baby shower post a couple days ago, you may remember I mentioned that I loved the mantlescape I did.  I loved it so much that I didn't want to put my old things back out.  I've become a huge fan of white lately... anything I buy (except for clothes... can't stand white clothes) has to be white.  For the baby shower, I put scrapbook paper in the frames under the TV and loved how it brought the whole color scheme together.  So instead of putting the photos back in the frames, I rummaged through my paper box and filled them with cute scrapbook papers.


I love this one oh so much.  The silhouettes are velvety soft and it's just so stinkin' cute!


I lovey lovey love it.  And it was so simple... why didn't I think of it before?

Sunday, June 12, 2011

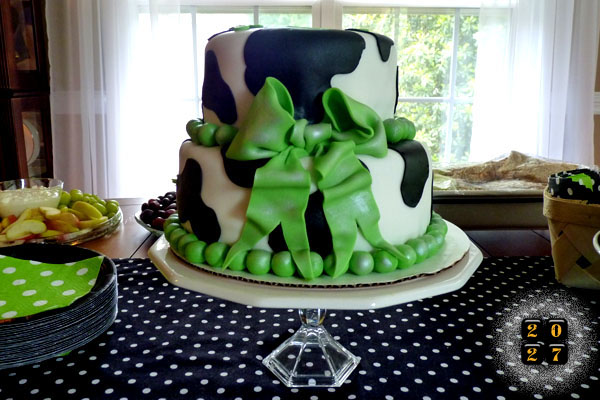
Black, White and Green Polka Dotty Cow Themed Baby Shower

A couple weekends ago, my aunt, cousin and I threw a baby shower for my other cousin.  She's due in July with a baby boy.  The inspiration behind the theme was the mom-to-be's love of cows.

I made the invitations with help from my Cricut.


I bought two packs of flat black cards and envelopes at Michaels, cut the cards down so I could add a polka dotty border, and added some green and black grosgrain ribbon (the green looks muted in the above pic but it was actually really bright).  I cut out the cow, the letters, and the white shape on the front of the envelope with my Cricut.  I printed out the deets using some cute fonts (The words were supposed to be black but apparently my printer was running out of ink so they printed gray.  Oh well.  I meant to do that.), attached a piece of ribbon with a brad and slid it in a slot I'd made in the black card (so it slid down between the polka dotty paper and the black card).  Cute, right?  I was pretty proud of them.


I wanted to do some outside decor so the guests could find my house easily and thought I could make a cow print garden flag out of felt.  So sad, but I didn't get any pictures of it hanging up with the balloons attached to the flag stake!

Abbie is addicted to felt.  When she started getting in the way of my work, I threw a scrap piece on the floor and that kept her busy for a while.


Ta da!  I used a piece of poster board as the backing, hot glued two pieces of white felt to it, then cut random cow spot looking shapes out of black felt and hot glued them as well.  I attached pieces of the same green ribbon I used on the invites to the top for the flag to hang from, cut out a big N (for Noah, the baby's name) with my Cricut, and voila!  Easy cow print garden flag.

I think my front doors look empty without wreaths, and I really wanted to make some for the shower.  I found these awesome wreath forms at AC Moore for $5 each!  I thought that was an awesome price for something that can be changed time and time again.  I just weaved some ribbon through so they matched the shower colors.  Now I have cool wreaths that I can change up as often as my heart desires!


A few weeks before the shower, I started collecting mason jars to use as drinking glasses.  I bought the white melamine tray at Target for $12.99, and got the tags, baker's twine, and paper straws on Etsy.  The hard part was finding places to stash the jars when the shower was over.  Thankfully I was able to squeeze them in the cabinet above the microwave.


I rounded up all my white decor items and came up with this mantlescape.  Actually, I really like this look for summer, so I'm leaving it!  I replaced the photos in the frames with the same scrapbook paper I used for the invites and wrote "Welcome Baby" in the center two. (I'm thinking about not putting photos back in these frames and just framing some cute scrapbook paper instead.  I really liked the way this turned out.)


Welcome baby Noah Glenn!


Of course a party's not a party without some tissue paper pom poms.  This was my first time making them and it was so super easy!  I pawned them off on the mom-to-be when she left the party because seriously, where do you store these huge things?  And I would feel bad throwing them away.  I guess you could take them apart and use the tissue paper, but after all that folding and cutting, it just seems like a waste!

Can you spot the cow print piggy bank in the above photo?  My friend Crystal and I were at Dollar Tree and she found this cute plain ceramic pig and said "Hey, you could paint cow spots on him!" and I was like "Um, but he's a pig."  Needless to say, she convinced me and for only $1 and ten minutes of my time, I think it's the cutest thing ever!


We had the cake made and it was by far the most expensive thing at the shower.  It turned out so cute though!  But it was huge.  We saved the top tier for the baby to eat on his first birthday.


And, finally, here's the Mom-to-Be!  Congratulations Tess!  We can't wait to meet baby Noah.

Linking to these parties.

Monday, May 16, 2011

Empty Frame Gallery Wall

A couple weeks ago on one of my days off I was straightening up my craft room when I realized I had collected quite a few Goodwill frames.  I'd been buying them whenever I found one I liked, for this idea I'd had brewing around in my head.  I didn't think I had enough yet, but I took out the ugliness that was in each one of them and started laying them out (on my guest room floor - probably the smallest space I could have chosen).  And whadya know, but I think I had just enough to make an empty frame gallery wall!  Okay, okay, I know this isn't a new idea or anything, but what a cheap way to make a statement!

I measured the wall I wanted them on and started playing with different configurations.

Hmm, I liked starting with the two white ones in the middle and working out from there, but this arrangement left something to be desired.

I found the one on the bottom left in our under-the-stairs storage closet and added it.  A little better.

Hmm, the right side needs something else.

Almost there...

This is it!  Except I ended up hanging the brown one on the right horizontally.


Now for a couple coats of black spray paint on the ones that aren't already black.


I traced all of the frames onto kraft paper, cut them out and taped them up on the wall in the arrangement I decided on.  (An easier way would be to roll out a huge sheet of kraft paper, lay your frames on it and trace them in the design you want.  That way instead of having individual rectangles of paper to hang up on the wall, which always want to curl up and come off, you'd only have one sheet and wouldn't have to make sure they were all level and the spacing was correct, because you could do all that while you're tracing.)

I got out my hammer and pounded nails in where I had marked on the kraft paper, put the frames up, then stuck some poster putty in the bottom corners so they would stay straight, and voila!


I like the dimension the different frames give to the wall.  I stayed safe with black, but I think a turquoise or red would be fun too!

Total cost for this wall art:  $6 for the keys, and probably another $6 for all the frames.  Already had the spray paint.  $12 for a wall full of art - I'll take it!

Linking up with Sarah's Spray Paint Party!

spray paint party

Friday, May 6, 2011

Epic Quatrefoil Mirror Redo

Remember back in, um, October when I wrote this post?  Well, I am finally ready to reveal the makeover my fabulous quatrefoil mirror underwent!  Whew, was this the longest mirror makeover in history, or what??

Here she is in all her "before" glory.  Ugly brown paint, chipping everywhere (and not in a good way).

Hi, feet!


It was destined to be hung on this wall at the end of the hallway.  I never did like that picture frame there.

So right after Christmas (yes, you read that right) I took this bad boy downstairs and started the transformation.  I turned it over, took all of the little bitty screws out of the half-moon holder thingies...


And what do I find but the mirror is caulked all around with silicone and I can't get it out.  Boo!

Onto Plan B.


Cut up lots of little pieces of kraft paper and slip them behind the wood to protect the mirror!  Brilliant!  (Even if it did take foreva.)


I gave the wood a light sanding...


...then opened the white paint and went to work!


It needed a couple of coats to cover up that dark brown.  After it dried, I slipped all of the kraft paper out.  Note to self for future quatrefoil mirror redo:  take kraft paper out while paint is still wet.  It will save you a lot of hair-pulling.

And here's where she sat for four months!


Until I finally picked up some of these from Lowes.


5 minutes later and she was finally at home.

I apologize for the night-time picture but I knew if I didn't snap a pic right then, it would be another four months before you guys would see it!

I love it!  I think it fits the space much better than that tiny picture frame did.  And she will tie in beautifully with the laundry closet redo I'm planning (it's on the left in the above photo).

Monday, May 2, 2011

Craft Room: Creating a Custom Framed Cork Board

I've been needing a place to pin up my random thoughts and lists in my craft room. I had the perfect place above my desk, but I didn't want to go out and buy something because 1) cork boards can be expensive and 2) I wanted it to fit the space perfectly. So I bought a roll of cork and some red acrylic paint at HobLob, grabbed my Cutting Edge Stencils "Casablanca Allover" stencil that I won months ago from Lemon Tree Creations (thanks LTC girls!) - which is still destined to be used someday in the laundry closet - and went to work!


First, I used some painters tape to measure off the area I wanted my cork board to cover.


I taped down some kraft paper to protect my floors, cut the cork to the right size, and started stenciling! This is the first time I've ever stenciled anything and it went really fast. Such high impact for so little cost!


Here she is all done! But then I started thinking... hmm, this cork is awfully thin, I bet it's too thin to hold a pushpin. I tested it out and sure enough, unless I wanted tons of little holes in my wall If I ever decide to take this down, I was going to have to do something to remedy this problem. (Seriously Cork Board Manufacturers, what is the point of making cork too thin to hold a pushin?)


Enter:  foam core! I taped three sheets together, then used construction adhesive to glue the cork on top of it. Sorry, no pictures of that!


I removed the tape from the wall and used double-sided foam tape to adhere my fabulous new cork board. Then weeks went by...


Until the other day when I finally got Steven to help me drag some leftover molding* out of the basement. We measured it out and used a hand saw to cut it down. I bought the decorative squares at Lowes so I didn't have to do any mitered corners - so much easier, and cuter, I think! I spray painted all the molding white, attached it to the wall with more double sided foam tape (I didn't want to have to fill any nail holes!), and voila! You could see the unfinished edges of the cork so I just added some pink ribbon tacked on with thumbtacks, and a couple little flowers to tie the pink and red together.

Now I can pin things up to my heart's content! I just love it!

*In the US, the trim that goes around doors, on walls, etc is spelled "molding". In Australia, the UK and Canada, it's spelled "moulding". You wouldn't write "My favourite colour of moulding is white." You would write "My favorite color of molding is white." Just a little something that gets on my nerves because I see people spell it "moulding" all. the. time. We're Americans people - we don't put u's in unnecessary places! Okay, tirade over for today.