Showing posts with label Crafting. Show all posts

Sunday, June 12, 2011

Black, White and Green Polka Dotty Cow Themed Baby Shower

A couple weekends ago, my aunt, cousin and I threw a baby shower for my other cousin.  She's due in July with a baby boy.  The inspiration behind the theme was the mom-to-be's love of cows.

I made the invitations with help from my Cricut.


I bought two packs of flat black cards and envelopes at Michaels, cut the cards down so I could add a polka dotty border, and added some green and black grosgrain ribbon (the green looks muted in the above pic but it was actually really bright).  I cut out the cow, the letters, and the white shape on the front of the envelope with my Cricut.  I printed out the deets using some cute fonts (The words were supposed to be black but apparently my printer was running out of ink so they printed gray.  Oh well.  I meant to do that.), attached a piece of ribbon with a brad and slid it in a slot I'd made in the black card (so it slid down between the polka dotty paper and the black card).  Cute, right?  I was pretty proud of them.


I wanted to do some outside decor so the guests could find my house easily and thought I could make a cow print garden flag out of felt.  So sad, but I didn't get any pictures of it hanging up with the balloons attached to the flag stake!

Abbie is addicted to felt.  When she started getting in the way of my work, I threw a scrap piece on the floor and that kept her busy for a while.


Ta da!  I used a piece of poster board as the backing, hot glued two pieces of white felt to it, then cut random cow spot looking shapes out of black felt and hot glued them as well.  I attached pieces of the same green ribbon I used on the invites to the top for the flag to hang from, cut out a big N (for Noah, the baby's name) with my Cricut, and voila!  Easy cow print garden flag.

I think my front doors look empty without wreaths, and I really wanted to make some for the shower.  I found these awesome wreath forms at AC Moore for $5 each!  I thought that was an awesome price for something that can be changed time and time again.  I just weaved some ribbon through so they matched the shower colors.  Now I have cool wreaths that I can change up as often as my heart desires!


A few weeks before the shower, I started collecting mason jars to use as drinking glasses.  I bought the white melamine tray at Target for $12.99, and got the tags, baker's twine, and paper straws on Etsy.  The hard part was finding places to stash the jars when the shower was over.  Thankfully I was able to squeeze them in the cabinet above the microwave.


I rounded up all my white decor items and came up with this mantlescape.  Actually, I really like this look for summer, so I'm leaving it!  I replaced the photos in the frames with the same scrapbook paper I used for the invites and wrote "Welcome Baby" in the center two. (I'm thinking about not putting photos back in these frames and just framing some cute scrapbook paper instead.  I really liked the way this turned out.)


Welcome baby Noah Glenn!


Of course a party's not a party without some tissue paper pom poms.  This was my first time making them and it was so super easy!  I pawned them off on the mom-to-be when she left the party because seriously, where do you store these huge things?  And I would feel bad throwing them away.  I guess you could take them apart and use the tissue paper, but after all that folding and cutting, it just seems like a waste!

Can you spot the cow print piggy bank in the above photo?  My friend Crystal and I were at Dollar Tree and she found this cute plain ceramic pig and said "Hey, you could paint cow spots on him!" and I was like "Um, but he's a pig."  Needless to say, she convinced me and for only $1 and ten minutes of my time, I think it's the cutest thing ever!
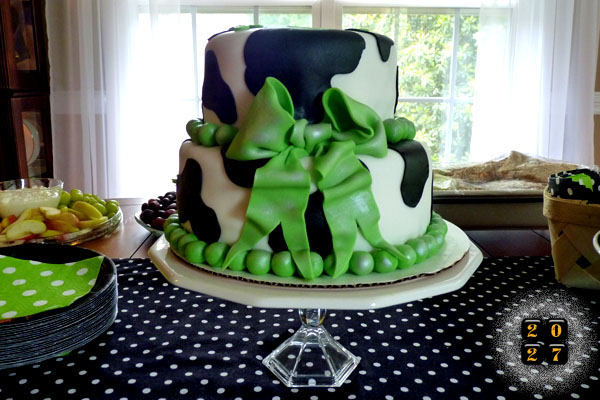

We had the cake made and it was by far the most expensive thing at the shower.  It turned out so cute though!  But it was huge.  We saved the top tier for the baby to eat on his first birthday.


And, finally, here's the Mom-to-Be!  Congratulations Tess!  We can't wait to meet baby Noah.

Linking to these parties.

Thursday, April 28, 2011

Color Blocked Rick Rack Wreaths

I've been stumped about how to decorate our front porch for spring this year.  I've never done springy wreaths before, but after taking down our Christmas wreaths, our doors just looked naked.

I bought two straw wreaths half off at HobLob a few months ago.  They sat barren for a long time until I finally just decided to do something.  I raided my stash to see what I had, and voila - color blocked rick rack wreaths (say that five times fast)!


I had leftover burlap and jute (the starting point for these beauts), bought two skeins of yarn, some rick rack and burlap garland (I didn't even know they had such a thing until I stumbled across it at Michaels!) and just wrapped it all around until it suited me.  I added a P that's been in my stash forever but has never had a proper home.


I'm usually all about symmetry, and to tell you the truth, it still kinda bugs me that there's a P on one side and nothing on the other, but I'm trying to live with it for a few weeks and see what I think.  I'm just telling myself that the P signifies to people that that's the door that opens (as if the door handle isn't enough of a clue - ha!).  Anywho, I love the yellow, teal and red together.  Those colors are just speaking to me right now.

Also, don't you just love our front doors?  I just love them.  But when it comes to decorating our front porch, stoop, whatever you want to call it, it's twice the work!  But moving furniture in and out sho' is easy!


Beautiful red ceramic planters at Home Depot - I have my eye on you next!

Linking Up:
Visit thecsiproject.com

Monday, March 7, 2011

Burlap, Book Page and Jute Bunting

I had a crafty urge one day and I thought, what better than to combine four of the most popular trends in the blogosphere now: burlap, book pages, jute, and bunting!  I had some leftover burlap from my table runner, an old book I was willing to rip up and some jute, so cost for this project = free!  I used my Cricut to cut the bookpages into pennant shapes, then I freehanded triangles out of burlap, hot glued it all together, and voila!

Okay, so I did this project a while back (note the Valentine's decor on the table), but I've been a really bad blogger lately!  Mostly it comes down to laziness.  I wish they had some kind of medication for it.  It's really a very debilitating disease.

Steven came home after I put this up and asked if we were having a party, but he just doesn't understand.  I forgive him.  I think it's cute and only took an hour or so, and most of that was spent loading book pages into the Cricut!

Love.

Sunday, January 16, 2011

Paint, wreath, and a new rug!

I've been a tad MIA... have you noticed?  I missed my blog-iversary and everything!  I started this blog one year ago on January 7th.  I should have done something monumental, but oh well.  There's always next year, right? :)

So this is what I've been up to the past week and a half:

I (finally) painted the baseboards in our guest bathroom!


Soooo much better, right?

I joined in the club and made a yarn wreath with book page accents!


The flowers are attached with velcro, in case I ever decide to change it, but I just looooove it the way it is for now.

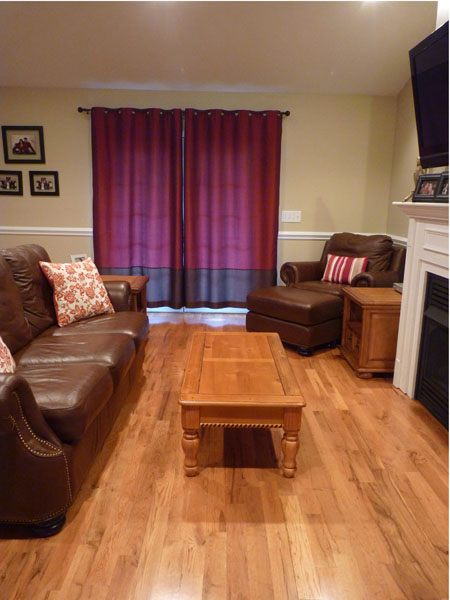
And the most exciting thing EVER... we finally got a rug for our living room!  I spied it at Target, it was on sale, and I had a gift card... I couldn't pass it up!  Of course I had to do a little redecorating too.


Yes, we have had the materials to put the TV cords inside the wall for 3 years, but no, we have not gotten around to it yet.


There used to be a basket on this end of the couch because there wasn't room to have both of our end tables, but I got this little table from my mom and I just LOVE it here.  Now we have two end tables and it doesn't take up any more space than the basket did!  Also, the chenille throw is actually a darker red but is showing up really bright in all the photos.


Just so you know what it looked like before...

And now!


I think it's much cozier and feels more like a pulled together space.

Oh, and I got a bunch of twigs.

So that's pretty much what I've been up to for the last few days.  I have a full week left before I start work, so I'm hoping to get a few more things accomplished!  I'm thinking: paint the baseboards in the basement bath (whew, that's a tongue-twister), figure out a tablescape for the dining table (I've been stumped on winter accessories!), and do some crafting for b-day presents.

Hope you all had a fabulous weekend!

Monday, October 4, 2010

Tombstone Shadow Boxes


If you remember, I picked up three shadow boxes at a garage sale a while back.  Last week, I came up with a brilliant (if I do say so myself) idea for them.

I pass by an extremely old cemetery on my way to work every day and I have always wanted to stop and look at it.  The tombstones are practically falling apart and the whole place has a certain charm to it (as much as a cemetery can, I guess).  So anywho, I stopped there on my way home Wednesday and snapped some photos to be transformed into creepy Halloween artwork (I'll admit... I was a little freaked out and got out of there as quickly as I could).  Most of the tombstones are so old that you can't even read them anymore.  It's just so interesting to look at them and think someone has been buried there since 1845.  I mean, that's a looooooong time ago.  Okay, kinda creepy to think about, but interesting too.  Here are the photos before, and then after I Photoshopped them.


First, I printed two copies of each photo on high-quality photo paper.


On one of the copies of each photo, I cut out one tombstone using a craft knife.


Then I took the other photo and mounted it to the backerboard of the shadow box using double-sided tape.


Pop-up Glue Dots... my favorite!  I placed one glue dot in the middle of the tombstone...


...and set the cut-out on top for a 3D effect.


I used Martha Stewart's bat template as a starting point and free-handed some bats on black cardstock and cut them out.


Bats!  Hmm, just realized I forgot to take a picture of them post-glitter, but just imagine 3 of these bats all glitterized in silver.


I used a piece of transite to attach the bats to the top of the shadow boxes, using regular tape.


The finished product!  Pretty creepy, right?  I added some black rose petals and a skull leftover from my Skulls and Spiders Wreath to complete the project.  It's extremely hard to take decent photos in bad lighting of objects with glass.  Have you ever tried it?  Extremely difficult, so I'm sorry if these photos don't do it justice.


What do you think?  I like that these can easily be changed for the seasons or whatever whim I'm on that week.