Sunday, January 16, 2011

Paint, wreath, and a new rug!

I've been a tad MIA... have you noticed?  I missed my blog-iversary and everything!  I started this blog one year ago on January 7th.  I should have done something monumental, but oh well.  There's always next year, right? :)

So this is what I've been up to the past week and a half:

I (finally) painted the baseboards in our guest bathroom!


Soooo much better, right?

I joined in the club and made a yarn wreath with book page accents!


The flowers are attached with velcro, in case I ever decide to change it, but I just looooove it the way it is for now.

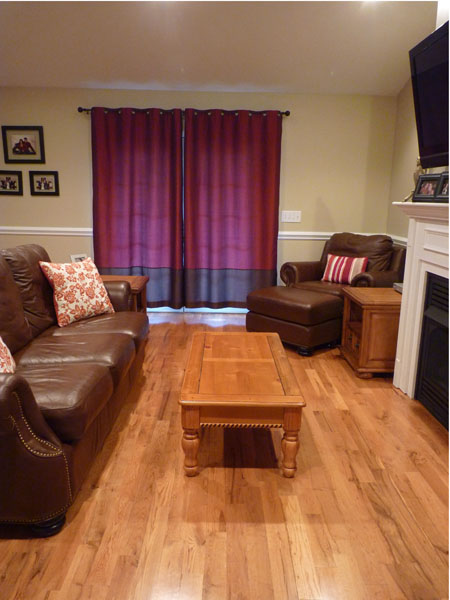
And the most exciting thing EVER... we finally got a rug for our living room!  I spied it at Target, it was on sale, and I had a gift card... I couldn't pass it up!  Of course I had to do a little redecorating too.


Yes, we have had the materials to put the TV cords inside the wall for 3 years, but no, we have not gotten around to it yet.


There used to be a basket on this end of the couch because there wasn't room to have both of our end tables, but I got this little table from my mom and I just LOVE it here.  Now we have two end tables and it doesn't take up any more space than the basket did!  Also, the chenille throw is actually a darker red but is showing up really bright in all the photos.


Just so you know what it looked like before...

And now!


I think it's much cozier and feels more like a pulled together space.

Oh, and I got a bunch of twigs.

So that's pretty much what I've been up to for the last few days.  I have a full week left before I start work, so I'm hoping to get a few more things accomplished!  I'm thinking: paint the baseboards in the basement bath (whew, that's a tongue-twister), figure out a tablescape for the dining table (I've been stumped on winter accessories!), and do some crafting for b-day presents.

Hope you all had a fabulous weekend!

Tuesday, January 4, 2011

Happy Birthday to Me: Fabulous Bathroom Hooks!

Today was my birthday (well, yesterday I guess seeing as it's after midnight)!! How did I celebrate, you ask? 

By giving our master bathroom a mini-makeover!

It all started last week with a trip to Hobby Lobby (I had a $10 gift card that was burning a big fat hole in my pocket!).  I didn't go in with anything particular in mind, but when I went down the clearance aisle, I found some glass vases that I just knew would look perfect around our bathtub.  They even matched the Ball jars I got at a garage sale over the summer that I really wanted to incorporate into my bathroom decor. 

The before:

A couple of seashell owls and the Ball jars just randomly sitting there.

And, the after:


Love!  I want to get a bunch of off-white votives to fill in the rest of the space around the bathtub and provide cozy mood lighting should I ever actually decide to take a bath.

On Monday, I went down to Charlotte with my aunt, where we stopped into Southpark Mall and whadya know but they have an Anthropologie store!  I picked up two cast-iron hooks that I just couldn't resist.  When I got them home I was a little unsure how they would look on the wall where I wanted to put them.  It seemed to me that two random hooks in the middle of the wall all by themselves would look a little bland.  So off to Houzz I went to search for ideas.  I saw a photo of someone's mudroom, and they had frames hanging on the wall, with coat hooks in the middle of them - genius!  Theirs were all fancy with either scrapbook paper or wallpaper in the center of the frame, but mine were going to be in a bathroom so I didn't want to take any chances with paper.  I woke up on my birthday with a mission - find cheap frames!


I got these lovelies at Goodwill - $1 each!  Score!  I picked up some Vintage Copper spray paint and two little wooden plaques that are supposed to be used in some capacity for crown molding. 


There were quite a few staples holding the picture in, but they were no match for a pair of pliers!


Except, I sustained an injury in the process.  My hands don't look so wrinkly in person... I blame it on the close-upedness.


Whew!  Hard work.


So, here they are, de-uglified.  Well, almost.


There!  Lovely.

Random picture time.  I had my camera on and I set it on my bathroom counter for a second.  When I came back to it, I noticed this on the screen and just had to snap the pic.  Doesn't my curling iron cover look cool?


Now back to our regularly scheduled programming.

Blank, boring wall before:


Our towel situation before: 

We had to fold our towels twice just so they would both fit on this short rod.  It took them forever to dry all the way, plus it just looked sloppy.  I really (and I mean really) wanted to put some nice pretty towels on this rod instead.

The mid-after:


Hallelujah!  We're getting somewhere...


Wondering why I chose vintage copper?  The color ties in with our counter top, and the accent pillows we have on our bed (you can see our bed in the background of the last photo in this post).


Here they are, complete with towels and white paint to camouflage the screws:

Eeee!  How I have dreamed of bathroom hooks...

If you're wondering where those two little wooden plaques went, they're still sitting on the kitchen counter.  I haven't decided what I'm going to do with them.  I bought them with intentions of painting "his" and "hers" on them and mounting them above the frames, but then I had a stroke of genius and thought "Hey, I'll use my new Cricut Imagine and cut his and hers out of vinyl and put it right on the wall!"  Well, I'm still working on that.  Stay tuned.

While I was in the bathroom makeover mood, I moved the tissue holder (see it there in the background? Yes, you're right, it doesn't have tissues in it, but that's because I can't find them and I know we have four boxes somewhere so I refuse to buy more! Oh the joys of moving.) and replaced it with these apothecary jars from my stash, with some rock vase filler and seashells I gathered in Florida. I think having the glass there makes the countertop seem larger and I just love it.


Prettier towels - yay!  I still want some new ones though.  It's on my list.

Total cost for blue glass vases:  $16 ($26 - $10 gift card)
Anthropologie Hooks: $24
Frames: $2
Spray paint: $6

Total cost for master bathroom mini-makeover = $48


Monday, December 27, 2010

Belated Post: Our 2010 Christmas Card

I make our Christmas cards every year.  Yes, I'm crazy.  This year it took me a whole week every night after work and a day or two during naptime.  Here they are...


The circle flap is supposed to be taken off and hung on the tree as an ornament, but no one got it. Sad.


I try to come up with something new and original every year, and I'm really proud of this year's.


I think our photo turned out really well, too.  I just set up my camera on a barstool and set the timer.  I think it's really cute.  Just ignore the fact that my husband isn't wearing his wedding band.  We are still married, he's just forgetful.

Sunday, December 26, 2010

Quilled Monogram Plaques

I decided to make gifts for my cousins this Christmas, for no other reason than I'm crazy.  I think they were a hit Christmas morning, so maybe I did something right.  I made 10 total, and they were all completely different, but of course, I didn't get a picture of all of them, so here are a couple.


I started with blank wood plaques I got at JoAnn for a couple bucks (rectangular for the boys, curvy for the girls).  On some of them, I painted the wood opaque white before painting the edge a color, but on most some of them, I just did a light whitewash with a sponge roller.  Then I painted the edge with one of the acrylic paints I had in my stash, and distressed them a little.

I created the monograms in Photoshop (using Rockwell font), printed them, traced the smaller initials onto the plaque, and the larger initial onto fancy scrapbook paper.


Hmm, my first attempt at cutting out an S didn't turn out so well.  I didn't realize I had to trace the reverse onto the paper since I was cutting it out from the back side.  Duh!


Much better the second time around!


I painted the first and middle initials onto the wood using black acrylic.


When I traced the initials onto the wood, I made marks at the top and bottom of the big initial for placement later.  I just Mod Podged it on.


I did some simple quilling, and voila!


After all the quilling was done, I sprayed a glossy clear sealant on them to protect the paper.  You can see from this picture that I started out doing more intricate designs, but each of those took three hours each, and I decided I didn't have enough time for that, so I simplified my design.  I still think they look pretty good, though.


The finished product included a ribbon for hanging!


Here's a close-up of one of the more intricate ones.

I love quilling. It is so fun and rewarding, but time consuming. Remind me to start making my gifts in October next year.

FYI: I've added these to my shop.

Tuesday, December 21, 2010

My Favorite Ornaments

I've been wanting to do a post on my favorite ornaments so I could play along with Flamingo Toes' Our Favorite Ornaments Party, but my ornaments and I were three states apart. Now that we're all reunited, here they are!


Of course, who doesn't have a s'mores ornament?  We bought this one (obviously) for our first Christmas together.


I bought these ice skates for our "rustic" tree and I love how it looks like they were just haphazardly thrown over the branch.


I love anything Disney, so this Mickey and Minnie ornament makes me happy.  We got it at Disney World last year and it resides on our rustic tree as well.


We bought this ice cream cone ornament at the Southern Christmas Show either last year or the year before (I can't remember). The bottom is an actual mini ice cream cone and the top is a ball ornament. Clever, huh?


My aunt bought me this little owl in New York last month, and I just love him.

  
I bought a set of 4 of these at Target three years ago and they make me smile each time I take them out of the box.

Christmas is only 3 days away... can you believe it?